Gym & Strength Intermediate Strength

How to Deadlift With a Neutral Spine

The deadlift is the single best test of how well you can pick something heavy up without hurting yourself — which is a skill you use every time you move furniture or lift a suitcase. It is also the lift most often taught backwards: people are told to "keep your back straight" without being told how, so they arch it, or round it, and hope for the best.
3–5 sets of 3–5Volume
2–3 minutesRest
IntermediateLevel
Controlled pullTempo
Jump to instructions
Deadlift Technique: Set-Up to Lockout

Why this works

The bar stays over your mid-foot, your shins stay close, and your trunk stays braced — together those three things keep the load stacked over your base rather than out in front of it.

Primary muscles

  • Glutes
  • Hamstrings
  • Spinal erectors

Also working

  • Lats
  • Forearms
  • Core
Goal
Strength
Level
Intermediate
Sets & reps
3–5 sets of 3–5
Rest
2–3 minutes
Tempo
Controlled pull, 1 second at the top, controlled lower
Est. burn
8–12 per set

Equipment

  • Barbell
  • Plates
  • Chalk (optional)

Set-up

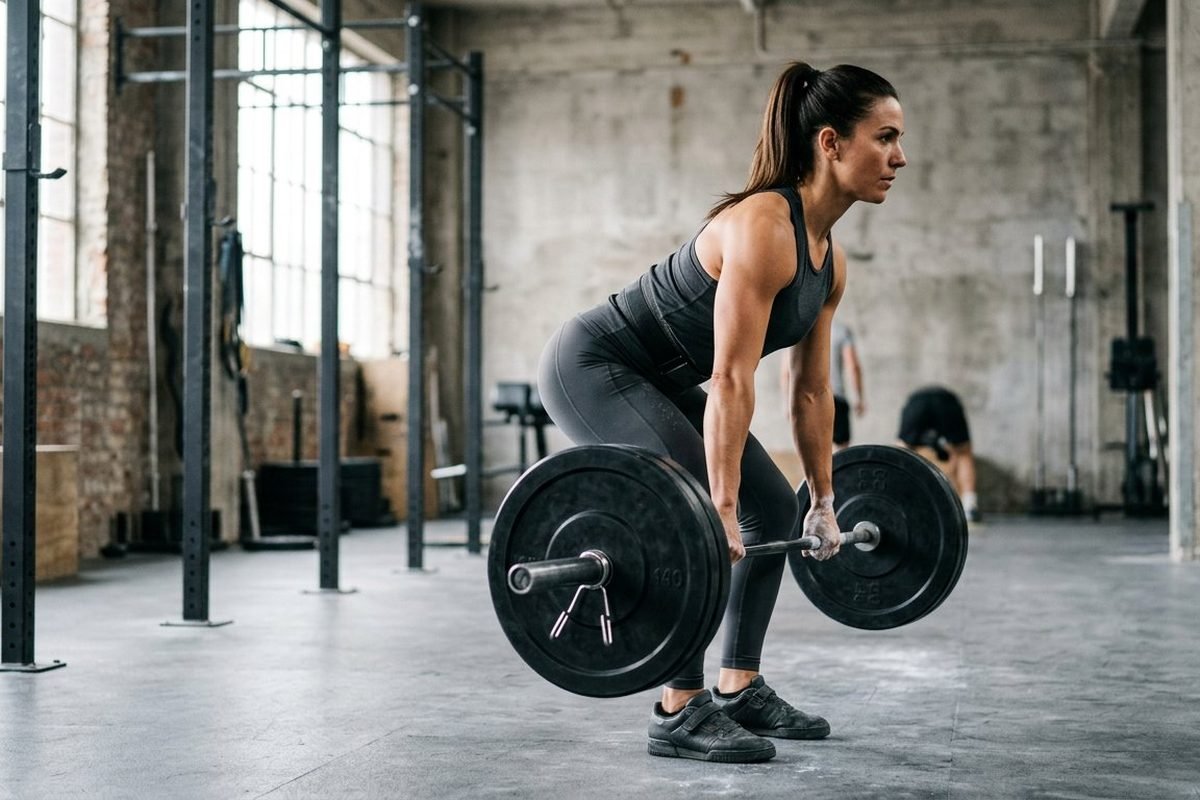
  1. Bar over your mid-foot, about 2–3 cm from your shins. Too far forward and the bar has to swing around your knees. Look down: the bar should cut your foot in half.
  2. Feet hip-width, toes forward or slightly out. A narrow stance lets your arms hang straight down outside your legs.
  3. Grip just outside your shins, hands on the bar, arms vertical. Double overhand to start. Switch to a mixed grip or straps only when your grip becomes the limiting factor.
  4. Hips high enough that your shoulders sit slightly in front of the bar, chest up, lats engaged. Squeeze your armpits as if you are protecting a £20 note. This pulls the bar tight to your legs before it moves.
  5. Big breath into the belly, brace hard, and pull the slack out of the bar. You will hear a small click as the bar contacts the plates. Take that tension before you pull — it is what keeps your spine safe.

How to do it, step by step

  1. Push the floor away rather than pulling with your back

    Think about leg-pressing the ground. The bar breaks the floor because your legs extend, not because your spine yanks.

  2. Keep the bar in contact with your legs the whole way up

    Drag it up your shins and thighs. Any gap between bar and body increases the strain on your lower back — this is the single most useful deadlift cue.

  3. Let your hips and shoulders rise at the same rate

    If your hips shoot up first, the bar drifts forward and it becomes a stiff-legged pull. If your shoulders rise first, you will round your upper back.

  4. Stand tall and squeeze the glutes, without leaning back

    Lockout is hips extended and ribs down. Do not hyperextend — leaning backwards at the top is a common ego habit that irritates the lower back.

  5. Lower with control: hinge at the hips, then bend the knees

    You do not need to drop the bar. Push your hips back, keep the bar close, and place it down. Reset your brace before the next rep.

Common mistakes (and how to fix them)

Lower back rounding at the start

Usually the bar is too far forward or the weight is above your current control. Reduce load by 20%, and practise the set-up with the bar at mid-foot.

Bar drifting away from the shins

Lats not engaged. Cue "pull the bar into your legs" and "protect your armpits" before every rep.

Hips shooting up first

You are trying to lift with your back. Reduce the load and think "chest up, push the floor away".

Coaching cues & progressions

  • Reset every rep in the first year. Touch-and-go reps hide technical errors and make form inconsistent.
  • If your lower back is sore the next day, that is a signal — re-check bar position and range before adding weight.
  • Trap bar deadlifts are a perfectly good substitute: a more upright torso, easier on the lower back, and ideal for older lifters or anyone returning from injury.
  • Deadlift once a week, not three times. It is the most systemically fatiguing lift you can do.

Safety notes

Stop the set the moment your back position changes under load. Never add weight to a rep that felt like a grind through a rounded spine. Do not jerk the bar off the floor, and do not round your upper back to finish a rep. If you have an existing injury, are pregnant, or are returning to exercise after a long break, get clearance from a doctor or physiotherapist before starting.

Suitable for

Frequently asked questions

Is deadlifting safe for your back?

Yes, when loaded appropriately and taught well. The movement pattern — hinging at the hips with a neutral spine — is protective, not harmful. The risk lies in jumping load too fast, lifting with a rounded back under fatigue, or never learning the set-up.

Sumo or conventional?

Whichever feels stronger in your hips. Sumo reduces the range slightly and spares the lower back; conventional loads the posterior chain more. Neither is inherently better.

Should I use straps?

Only once grip limits your sets. For general strength and grip development, train without them and use straps for the heaviest sets.

How heavy should I start?

Light enough that you could do 8 clean reps, and only pull 5. Most beginners start with an empty bar or 40 kg and add 2.5–5 kg per week while form holds.

Can I deadlift with a history of back pain?

Often yes — and it is frequently part of the solution — but get individual guidance. Start with a trap bar or hip hinge with a light load, and work with a physiotherapist if pain is recent.

Dr. Nadia Haddad

Writes and coaches for MoveWell. Every guide is reviewed by Dr. Erik Lund, PT before publication, and updated when the evidence changes. Read more about our team and review process →

Related guides

All exercises

One workout, every Sunday

A single programmed session for the week ahead, one technique explainer, and the reader question worth answering. Written by our coaches — no supplement ads, no 5am rhetoric.

Thanks — check your inbox to confirm. You can unsubscribe in one click.

By subscribing you agree to our privacy policy. 31,000 readers, no spam.